Wiring for Conversion from Generator to Alternator

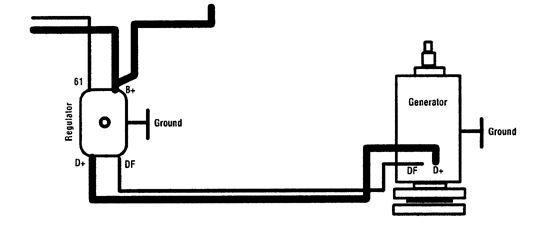
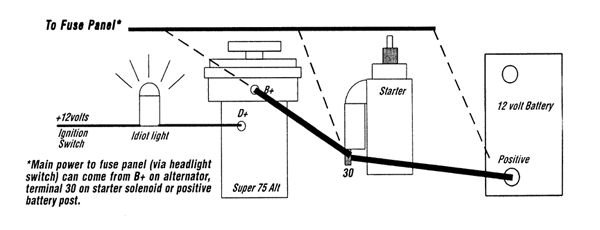
Note: These 2 images show stock generator wiring for reference purposes only
|
For cars with voltage regulator mounted on the generator:
Remove the small blue wire from the regulator; this wire will connect to the
"D+" terminal on the alternator
Remove the two large red wires from the voltage regulator.
If you are installing a stock 50 amp alternator, install loop
connectors on both wires and connect both to the "B+" post on
the alternator. If you are installing a "Super 75" alternator,
install a loop connector to the red wire coming from the left
side of car (going to the dash) and connect to the "B+"
post on alternator. Replace red wire going to the starter
solenoid with new "Monster cable".
|
|
 For cars with regulator mounted under rear seat or other location away from generator:
Remove the small blue wire and the small green wire from the regulator (terminals DF & 61). Cut off the push on
connectors from these wires and connect together using a "butt" connector
Remove the two large red wires from the "B+" terminal of the regulator Cut off the push on connectors from these
wires and connect together using a "butt" connector Remove the large red wire from the "D+'' terminal of the
regulator. Cut off the wire encl. Remove the large red wire from the "D+'' terminal of the generator and pull this wire
out of the car.
Remove the small green wire from the "DF" terminal of the generator. This wire corrects to the "D+'' terminal on the
alternator.
If you are installing a stock 50 amp alternator, use the large red wire previously removed from the car or a new 10
gauge wire to run from the "B+" terminal on the alternator to the "30" terminal on the starter solenoid.
If you are installing a "Super 75" alternator, use the, "Monster cable" to make the connection between the "B+"
terminal on alternator and the 30" terminal on the starter solenoid.

| Pulley Installation |
|---|
 When installing pulley make sure you have the proper
amount of shims installed in the complete assembly We
recommend using at least 10 shims To tighten the belt,
remove shim washers from between the, pulley halves;
loosen the belt, add shim washers. Store the leftover shim
washers between the, pulley outer half and the hat-shaped
special washer.
When belt tension is correct, torque the nut to 43 ft.
lbs., turn the pulley over several times and recheck the
torque. This is necessary to achieve proper tension on the
pulley halves. Without the proper amount of shims installed
and correct torque the pulley will come apart in a short
amount of time, often with disastrous results.
|
Precautions
Do not run the alternator without being connected properly from the B+ terminal to the positive battery terminal. This can cause damage to the alternator!
If the engine must be run without this connection, be sure that the wire to the D+ terminal
is disconnected.
For Super 75 applications "Monster cable" or equivalent must be used as the original output wiring is insufficient to carry the. high amperage of the Super 75.
On cars with older wiring the following precautions and test should be clone before installing the alternator, check for burned out bulb in dash indicator (aka "idiot light"). You must have a working indicator light for the alternator to charge properly.
Check alternator for proper ground. The alternator housing must have a good ground thru the engine, transmission, chassis and to the negative side of the battery. Usually the engine and transmission assembly is rubber mounted to the chassis therefore you must have an adequate ground strap from the engine or transmission to the chassis. Next you must have an adequate ground cable (in good condition) from the chassis to the negative side of the
battery. Replace ground strap/cable or positive cable if any signs of corrosion appear (Corrosion creates excessive resistance causing a voltage/amperage drop thru that cable.)
Troubleshooting
Low output - Follow procedures discussed above in "Precautions".
If you are experiencing a problem with alternator output you can test the ground circuit by making a temporary ground wire directly from the alternator housing to the chassis or body, (Bare metal). If after this the alternator output is correct then you know that there is a problem in the ground circuit.
Dash indicator light (aka "idiot light'') comes on very dimly or will not go out until eng RPM is increased:
Either of these symptoms usually indicates one or more "burned out" diodes in the alternator causing low output.
This is usually caused by one of two things:
a) A bad connection or open circuit between the alternator B+ (output) terminal and the positive battery terminal.
b) If the wire from the D+ terminal going to the clash indicator light should short to ground (even briefly) while the alternator is operating, the "diode trio" will be damaged.
If either of these conditions exists and is not corrected a replacement alternator is destined for failure also! To check circuit between alternator B+ (output) terminal and the positive battery terminal perform a voltage drop test. Connect the positive lead of a voltmeter to the B+ alternator terminal. Connect the negative lead to the positive battery terminal. Set meter to "autorange" or lowest voltage scale. Next, start the engine, turn on headlights, wiper motor, flashers, etc. to create a "load". Note the reading on the volt meter. If it is greater than .5 volts, you do not have an adequate circuit, The circuit needs to be repaired by cleaning all connections or replacing cables. If circuit is not repaired, alternator failure is eminent.
To test "diode trio" for damage:
Start the engine and turn on headlights, wiper motor, flashers, etc. to create a "load". Use a digital voltmeter to compare the voltage at the D+ terminal to the voltage at the B+ terminal. The "diode trio" is bad if the voltage at the D+ terminal is not within 0.2 - 0.3 volts of the B+ terminal reading.

 For cars with regulator mounted under rear seat or other location away from generator:

 When installing pulley make sure you have the proper
amount of shims installed in the complete assembly We
recommend using at least 10 shims To tighten the belt,
remove shim washers from between the, pulley halves;
loosen the belt, add shim washers. Store the leftover shim
washers between the, pulley outer half and the hat-shaped
special washer.